Gluten-Free Tuna Mayo Onigiri
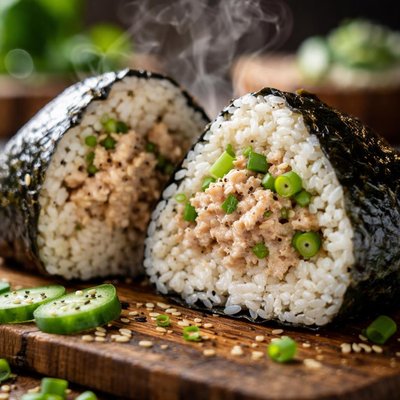
Discover the irresistible simplicity of Gluten-Free Tuna Mayo Onigiri, a Japanese-inspired rice ball recipe perfect for snack time, lunch boxes, or quick meals. This gluten-free adaptation features perfectly seasoned short-grain rice encasing a creamy, flavorful filling made from canned tuna and gluten-free mayonnaise, with an optional splash of gluten-free soy sauce for added umami. Wrapped in nori sheets for a signature savory touch, these handheld delights are easy to prepare with just a few staple ingredients and minimal effort, making them ideal for busy lifestyles. Whether made with a traditional sushi mold or shaped by hand, these onigiri are a satisfying treat that’s portable, customizable, and sure to please.
Smart Nutrition Tracking with SnapCalorie
Recipe Information
Ingredients
- 2 cups Short-grain white rice (or Japanese sushi rice)
- 2.5 cups Water
- 0.5 teaspoons Salt
- 1 can (5 ounces) Canned tuna (in water or brine, drained)
- 3 tablespoons Gluten-free mayonnaise
- 1 teaspoon Gluten-free soy sauce (optional)
- 3 sheets Nori sheets (seaweed, cut into strips)
- 1 piece Plastic wrap or sushi mold (optional)
Instructions
Rinse the rice under cold water until the water runs clear. This removes excess starch and ensures fluffy rice.
Add the rinsed rice and 2.5 cups of water to a rice cooker or pot. Cook according to the rice cooker's instructions or bring to a boil on the stove, then reduce to a simmer, cover, and cook for 18-20 minutes. Once done, let the rice rest for 10 minutes with the lid on.
While the rice is cooking, prepare the filling. Drain the canned tuna and mix it with the gluten-free mayonnaise in a small bowl. Add the optional gluten-free soy sauce for extra flavor if desired. Set aside.
Once the rice has cooled slightly, sprinkle in the salt and gently mix to distribute evenly.
Wet your hands slightly to prevent the rice from sticking. Take a small handful of rice (about 1/3 cup) and flatten it into a circle on your palm, or place the rice in a plastic wrap or sushi mold.
Place about 1 teaspoon of the tuna mayo mixture in the center of the rice. Fold the rice around the filling to form a ball or a triangle, ensuring the filling is fully encased in rice.
Wrap a strip of nori around the bottom of each onigiri for easy handling and added flavor.
Repeat with the remaining rice and filling until all onigiri are formed.
Serve immediately or store in an airtight container for up to 24 hours. If storing, place a damp paper towel over the onigiri to prevent the rice from drying out.
Nutrition Facts
Calories |
163 | ||
|---|---|---|---|
% Daily Value* |
|||
| Total Fat | 5.9 g | 8% | |
| Saturated Fat | 0.8 g | 4% | |
| Polyunsaturated Fat | 0.0 g | ||
| Cholesterol | 9 mg | 3% | |
| Sodium | 325 mg | 14% | |
| Total Carbohydrate | 19.5 g | 7% | |
| Dietary Fiber | 0.4 g | 2% | |
| Total Sugars | 0.0 g | ||
| Protein | 7.0 g | 14% | |
| Vitamin D | 0.4 mcg | 2% | |
| Calcium | 20 mg | 2% | |
| Iron | 0.4 mg | 2% | |
| Potassium | 99 mg | 2% | |
*The % Daily Value tells you how much a nutrient in a serving of food contributes to a daily diet. 2,000 calories a day is used for general nutrition advice.
